SwiftUI: Check Internet Connection with NWPathMonitor
To check the internet connection in a SwiftUI app, use NWPathMonitor from the Network framework. It tells you whether a network path is available, whether it is expensive or in Low Data Mode, and when any of that changes. It can't tell you the internet is actually reachable, so your requests still need to handle failure.
The 2012 version of this post was Objective-C. On a current project the tool for this is NWPathMonitor, and with Swift concurrency it fits into SwiftUI in a few lines. Everything below requires iOS 17.
Check once
NWPathMonitor is an AsyncSequence of network paths. For a one-off check, take the first path it delivers:
import Network

func isOnline() async -> Bool {
    for await path in NWPathMonitor() {
        return path.status == .satisfied
    }
    return false
}
The first path arrives almost immediately. Returning from the loop ends the monitor.
path.status has three values. .satisfied means a path is available. .unsatisfied means there isn’t one. .requiresConnection means the path isn’t up yet but making a connection may bring it up, as with a VPN that connects on demand.
Watch the connection in SwiftUI
Most apps want to react when the connection changes, not ask once. This class keeps the latest path in @Observable properties that any view can read:
import Network
import Observation

@MainActor
@Observable
final class NetworkMonitor {
    private(set) var isConnected = true
    private(set) var isExpensive = false
    private(set) var isConstrained = false
    private(set) var isCellularDenied = false
    private(set) var interface: NWInterface.InterfaceType?

    func run() async {
        let types: [NWInterface.InterfaceType] = [.wifi, .cellular, .wiredEthernet]

        for await path in NWPathMonitor() {
            isConnected = path.status == .satisfied
            isExpensive = path.isExpensive
            isConstrained = path.isConstrained
            isCellularDenied = path.status == .unsatisfied
                && path.unsatisfiedReason == .cellularDenied
            interface = types.first { path.usesInterfaceType($0) }
        }
    }
}
The class is @MainActor, so the loop runs on the main actor and every update lands there, ready for SwiftUI. There is no DispatchQueue to pass and no pathUpdateHandler to hop back to the main thread from.
isConnected starts as true. The first real path replaces it within milliseconds, and starting at false would flash an offline banner on every launch.
Create one monitor for the whole app, put it in the environment, and start it with .task:
@main
struct ConnectivityApp: App {
    @State private var network = NetworkMonitor()

    var body: some Scene {
        WindowGroup {
            ContentView()
                .safeAreaInset(edge: .top, spacing: 0) {
                    OfflineBanner()
                }
                .animation(.default, value: network.isConnected)
                .environment(network)
                .task { await network.run() }
        }
    }
}
.task starts the loop when the view appears and cancels it when the view goes away, so there is no start(queue:) or cancel() to manage.
Show an offline banner
Any view can now read the monitor from the environment:
struct OfflineBanner: View {
    @Environment(NetworkMonitor.self) private var network

    var body: some View {
        if !network.isConnected {
            Label(message, systemImage: "wifi.slash")
                .font(.subheadline.weight(.medium))
                .foregroundStyle(.white)
                .frame(maxWidth: .infinity)
                .padding(.vertical, 8)
                .background(.red)
                .transition(.move(edge: .top).combined(with: .opacity))
        }
    }

    private var message: String {
        network.isCellularDenied
            ? "Mobile data is turned off for this app"
            : "No internet connection"
    }
}
.safeAreaInset pushes the content down while the banner is showing instead of covering it, and the .animation on isConnected slides it in and out.
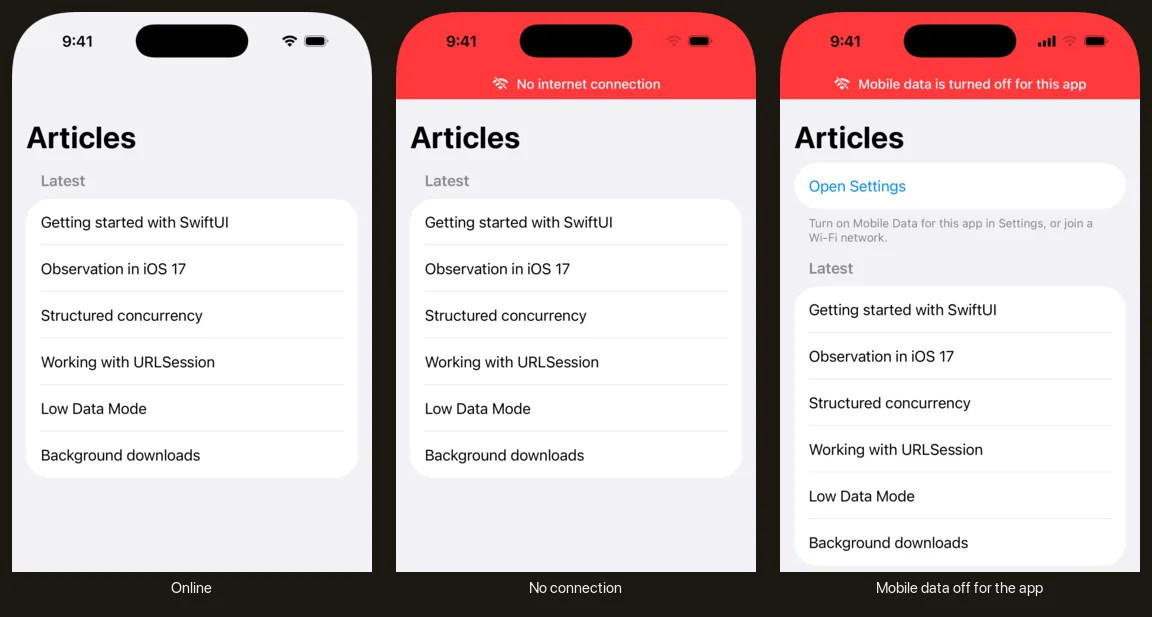
Test this on a device. The simulator uses the Mac’s connection and doesn’t reliably report changes to it. On a phone, Airplane Mode gives you .unsatisfied, and turning Wi-Fi back on gives you .satisfied again.
Mobile data turned off for your app
iOS lets the user switch off mobile data for a single app, in the app’s page in Settings. When they have, and there is no Wi-Fi, the path is .unsatisfied even though the phone has full signal and every other app works. That’s hard for the user to work out on their own.
path.unsatisfiedReason == .cellularDenied identifies it, which is what isCellularDenied is for. The banner above uses it to say what is wrong. A better screen would also offer a button that opens your app’s page in Settings:
struct OpenSettingsButton: View {
    @Environment(\.openURL) private var openURL

    var body: some View {
        Button("Open Settings") {
            openURL(URL(string: UIApplication.openSettingsURLString)!)
        }
    }
}
Low Data Mode and expensive connections
isConstrained is true when the user has turned on Low Data Mode for the current Wi-Fi network or for mobile data. isExpensive is true on mobile data and on a personal hotspot.
Use them to turn off what the user didn’t ask for: autoplaying video, prefetching, full-resolution images in a feed. Leave alone anything they tapped.
For a single request, URLRequest can refuse constrained networks by itself, and fail with a reason you can check:
func loadImageData(full: URL, reduced: URL) async throws -> Data {
    var request = URLRequest(url: full)
    request.allowsConstrainedNetworkAccess = false

    do {
        let (data, _) = try await URLSession.shared.data(for: request)
        return data
    } catch let error as URLError where error.networkUnavailableReason == .constrained {
        let (data, _) = try await URLSession.shared.data(from: reduced)
        return data
    }
}
In Low Data Mode the first request fails at once without touching the network, and the function falls back to the smaller image. allowsExpensiveNetworkAccess works the same way for mobile data and hotspots.
To try it, turn on Low Data Mode in Settings, under Wi-Fi, the (i) next to your network.
A satisfied path isn’t a working internet connection
.satisfied means the phone has a route to send packets. It doesn’t mean they arrive. On hotel and airport Wi-Fi behind a login page, or on a router whose own connection is down, the path is .satisfied and every request fails.
So don’t check isConnected before making a request and skip the request when it’s false. Make the request and handle the failure. Use the monitor for the UI: the banner, disabling a send button, retrying when the connection comes back.
When a request does fail, these are the errors that mean there is no usable connection, as opposed to a problem with your server:
extension URLError {
    var isOffline: Bool {
        switch code {
        case .notConnectedToInternet, .networkConnectionLost,
             .dataNotAllowed, .internationalRoamingOff,
             .cannotFindHost, .cannotConnectToHost, .timedOut:
            return true
        default:
            return false
        }
    }
}
For requests that should wait out a short drop rather than fail, set waitsForConnectivity on the session:
extension URLSession {
    static let waiting: URLSession = {
        let config = URLSessionConfiguration.default
        config.waitsForConnectivity = true
        config.timeoutIntervalForResource = 60
        return URLSession(configuration: config)
    }()
}
Set timeoutIntervalForResource as well. It limits how long a request can wait, and its default is seven days.
Everything in this post is in one file you can download from GitHub: NetworkMonitor.swift
There is also a Flutter version for iOS and Android that uses connectivity_plus.
